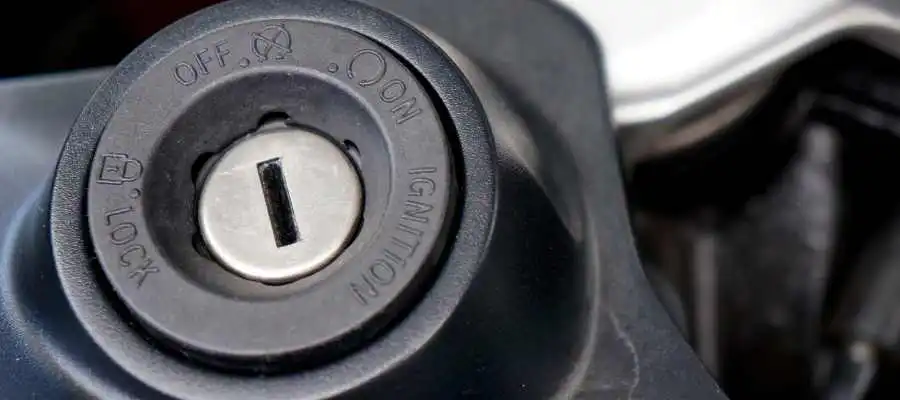
Your lawn mower’s ignition switch plays a key role in getting the machine up and running. If your mower has a hard time starting or stops working sporadically, it might be an ignition switch problem. In this article, we’ll discuss typical issues with lawn mower ignition switches, how to diagnose them, and what you can do to fix or replace the faulty parts.
How Lawn Mower Ignition Switch Works?
The ignition switch in a lawn mower controls the power to the engine. When you turn the key or press a button, it sends an electrical signal to the starter, initiating the process of starting the mower.
Ignition switches can vary in complexity, from simple keyed switches to more advanced electronic controls. Regardless of type, their role is to create a connection between the battery, starter, and engine to get your mower up and running. here are common types of ignition switches.
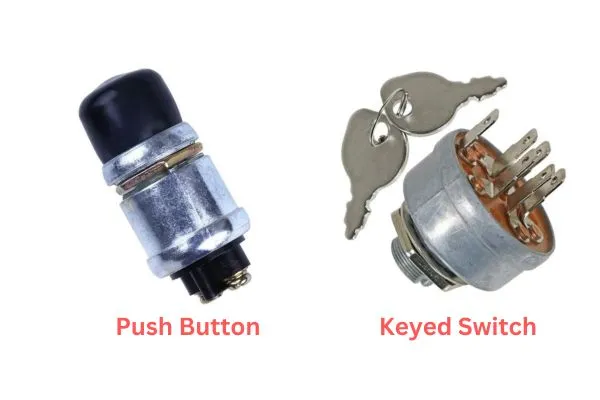
Keyed switches: These require a key to start the mower. They’re common in riding mowers.
Push-button switches: Typically found in more modern mowers, they replace keys with buttons.
Digital controls: These may involve more advanced technology, with electronic components that communicate with other systems in the mower.
But in this article, we’ll focus on issues related to keyed switches, which are commonly found in older lawnmower models. As these machines age and undergo extended use, problems with their keyed switches tend to emerge.
Related Articles: Fixing Lawn Mower Sputtering: Best Guide With Pro Tips!
Ignition Switch Common Problems and Their Causes
| Problem | Description | Potential Causes |
| Mower Won’t Start | The lawn mower doesn’t start when the key is turned. | – Faulty connections: Loose or corroded connections at the ignition switch. – Worn-out switch: The internal components are worn out, leading to poor contact. – Battery issues: A weak or dead battery may not provide enough power to activate the switch. |
| Intermittent Starting Issues | The mower has irregular starting problems, sometimes starting and sometimes not. | – Loose wiring: Vibration during mowing can loosen connections. – Dirty contacts: Dirt and debris can prevent proper contact within the switch. – Temperature fluctuations: Heat or cold can affect electrical components. |
| Ignition Key Stuck | The ignition key gets stuck, preventing the mower from starting. | – Debris in the switch: Dirt or small objects can get lodged in the keyhole. – Damaged key: A bent or damaged key can cause it to stick. – Internal switch damage: A broken internal mechanism can trap the key. |
| Electrical Problems | Various electrical issues can arise due to a faulty ignition switch. | – Short circuits: A shorted switch can cause electrical malfunctions. – Blown fuses: If the switch draws too much current, it can blow fuses, preventing the mower from starting. – Burnt wiring: High resistance from a faulty switch can overheat and burn wiring. |
Testing Lawn Mower Ignition Switch Problems
Steps to Test the Ignition Switch:
↪Access the Ignition Switch:
- Remove the dashboard of your mower by unscrewing the screws holding it in place.
- Locate the ignition switch and remove it from its housing by unclipping or unscrewing it.
↪Set Up the Voltmeter/Multimeter:
- Turn the voltmeter to the continuity setting (usually marked with a sound or wave symbol). This setting allows you to hear a beep when a circuit is complete.
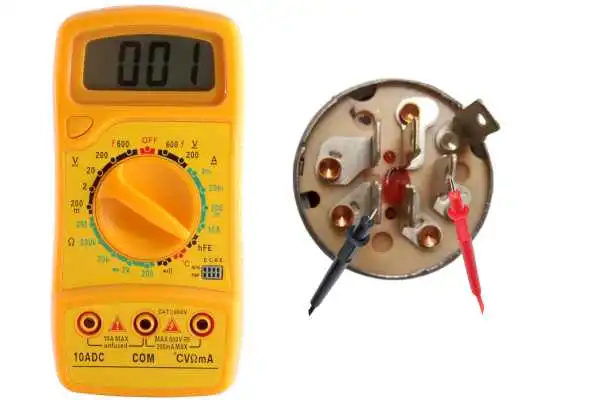
↪Check for Continuity between Ground and Magneto:
- Ensure the key is turned all the way off.
- Place one prong of the voltmeter on the “G” (Ground) and the other prong on the “M” (Magneto).
- If the circuit is working, you should hear a beep. If not, there’s a problem.
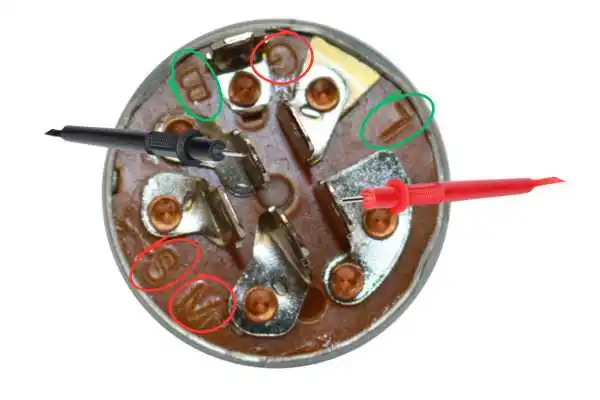
↪Check Continuity for Battery and Lights:
- Turn the key to the “Light” position.
- Place one prong on the “B” (Battery) and the other on the light prong.
- You should hear a beep indicating continuity. If not, there’s a problem.
↪Check Continuity for Battery and Solenoid:
- With the key in the start position, place one prong on the “B” (Battery) and the other on the “S” (Solenoid).
- If it’s working, you’ll hear a beep when the key is turned.
- This step may require an extra hand or alligator clips to hold the prongs while you turn the key.
↪Identify Faults:
- If there’s no continuity in any of the above steps, the ignition switch might be faulty.
- A properly working switch will provide continuity in all the above checks.
When to Repair vs. When to Replace
Deciding whether to repair or replace the ignition switch depends on several factors, If the switch has minor issues, like loose connections, repair may be possible.
Repairing a switch may be cheaper, but if the switch is significantly damaged, replacement might be more cost-effective in the long run.
Repairing a switch might require specific skills, whereas replacement is often more straightforward.
How to Replace an Ignition Switch
Replacing the ignition switch on your lawn tractor or mower can be straightforward. Still, it’s crucial to ensure you select the correct switch to avoid potentially costly and damaging mistakes.
🔘Why the Right Switch Matters
Many people assume that if a replacement switch has the same plug pattern as the original, it will work seamlessly with their equipment. However, this is a common misconception.
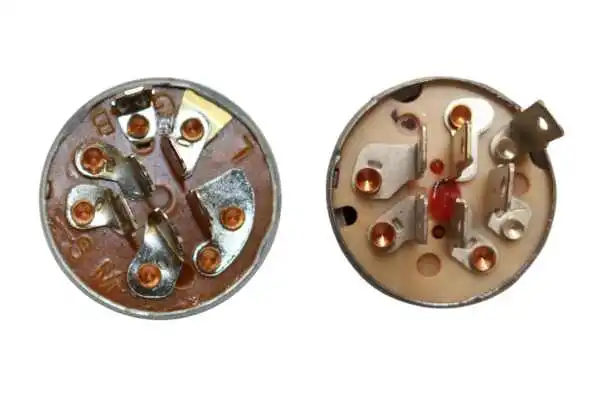
The arrangement of the tabs on the switch and their corresponding functions can vary greatly, even among switches with identical plug patterns.
🔘Potential Risks of Using the Wrong Switch
Using an incorrect switch can lead to various problems, ranging from minor inconveniences to severe equipment damage. Some common issues include:
- Loss of spark at the spark plug
- Failure to engage the PTO clutch
- Wires melting or shorting
- Blown fuses
- Inoperative lights or machine controls
- Equipment failing to turn off
One significant risk of using the wrong switch is that it can cause a malfunction in the ignition system, leading to further damage like a blown ignition coil. This can result in costly repairs and extended downtime for your equipment.
🔘Identifying the Correct Switch
Ignition switches typically have letters associated with each tab, indicating their function. These letters could be engraved on the plastic or stamped into the metal. If these identifiers are visible, you can easily ensure your replacement switch matches the original. Common letters found on ignition switches include:
- L for lights
- G for ground
- B for battery
- M for ignition module
- S for starter solenoid
It’s crucial to confirm that the letters on the new switch correspond to those on the original. If the switch is metal and the letters are not visible, you may need to use a wire brush to remove rust or corrosion to reveal the engravings.
In cases where the letters are entirely missing due to wear or damage, it’s essential to find a switch with the correct part number or consult with an expert to ensure compatibility.
🔘Replacing the switch
Disconnect the battery: Ensure safety by disconnecting the battery before you start.
Remove the old switch: This typically involves unscrewing it from its mount and disconnecting the wiring.
Install the new switch: Connect wiring according to the mower’s wiring diagram, and secure the switch in place.
Reconnect the battery: Once the new switch is installed, reconnect the battery and test the mower.
Preventing Future Ignition Switch Problems
Prevention is always better than cure. Here’s how you can prevent future ignition switch problems through regular maintenance and proper care.
🔘Regular Maintenance
Regular maintenance is key to preventing ignition switch problems. Follow these steps for ongoing care:
Clean the switch: Use compressed air or a clean cloth to remove debris.
Check connections: Tighten any that are loose, and clean corrosion as needed.
Lubricate: Apply a small amount of dielectric grease to prevent moisture buildup. I would recommend using thicker dielectric grease like Krytox 205.
🔘Proper Storage
Proper storage is essential for keeping the ignition switch in good condition. Here’s what you can do:
Store in a dry place: Moisture is a common cause of ignition switch problems.
Cover the mower: Use a cover to protect against dust and debris.
Avoid temperature extremes: Extreme heat or cold can affect electrical components.
🔘Keeping Connections Clean
Keeping electrical connections clean helps ensure smooth operation. Follow these tips:
Inspect regularly: Check connections for signs of wear or corrosion.
Use dielectric grease: This helps protect against moisture and ensures good electrical contact.
Replace damaged wiring: If you find frayed or broken wires, replace them promptly.
We hope these tips will help you avoid frustration and costly repairs. If you have experienced issues related to ignition switches, share your story in the comments below. Don’t forget to share this article, and be sure to subscribe to our newsletter for more lawn mower repair and maintenance tips. Happy Mowing!
